In this article, we are going to attempt to better understand why Bill felt his indicator should be considered awesome by evaluating the three most common AO trading strategies and a bonus strategy, which you will only find here at Tradingsim.
So, what is the Awesome Oscillator Indicator?
Awesome Oscillator
Well by definition, the awesome oscillator is just that, an oscillator. Unlike the slow stochastics, which is range bound from +100 to -100, the awesome oscillator is boundless.
While on the surface one could think the awesome oscillator indicator is comprised of a complicated algorithm developed by a whiz kid from M.I.T., you may be surprised to learn the indicator is a basic calculation of two simple moving averages. That’s right folks, not an EMA or displaced moving average, but yes, a simple moving average.
Awesome Oscillator Indicator Formula
If you have a basic understanding of math, you can sort out the awesome oscillator equation. The formula compares two moving averages, one short-term and one long-term. Comparing two different time periods is pretty common for a number of technical indicators.
The one twist the awesome oscillator adds to the mix, is that the moving averages are calculated using the mid-point of the candlestick instead of the close.
The value of using the mid-point allows the trader to glean into the activity of the day. If there was a ton of volatility, the mid-point will be larger. If you were to use the closing price and there was a major reversal, you would have no way of capturing the volatility that occurred during the day.
The fact Bill saw the need to go with the mid-point, well is a bit awesome.
Fast Period = (Simple Moving Average (Highest Price + Lowest Price)/2, x periods)
Slow Period = (Simple Moving Average (Highest Price + Lowest Price)/2, x periods)
Awesome Oscillator = Fast Period – Slow Period
One point to clarify, while we listed x in the equation, the common values used are 5 periods for the fast and 34 periods for the slow.
Williams stated in his book, “It is, without doubt, the best momentum indicator available in the stock and commodity markets. It is as simple as it is elegant. Basically, it is a 34-bar simple moving average subtracted from a 5-bar simple moving average.” [3]
You, however, reserve the right to use whatever periods work for you, hence the x in the above explanation.
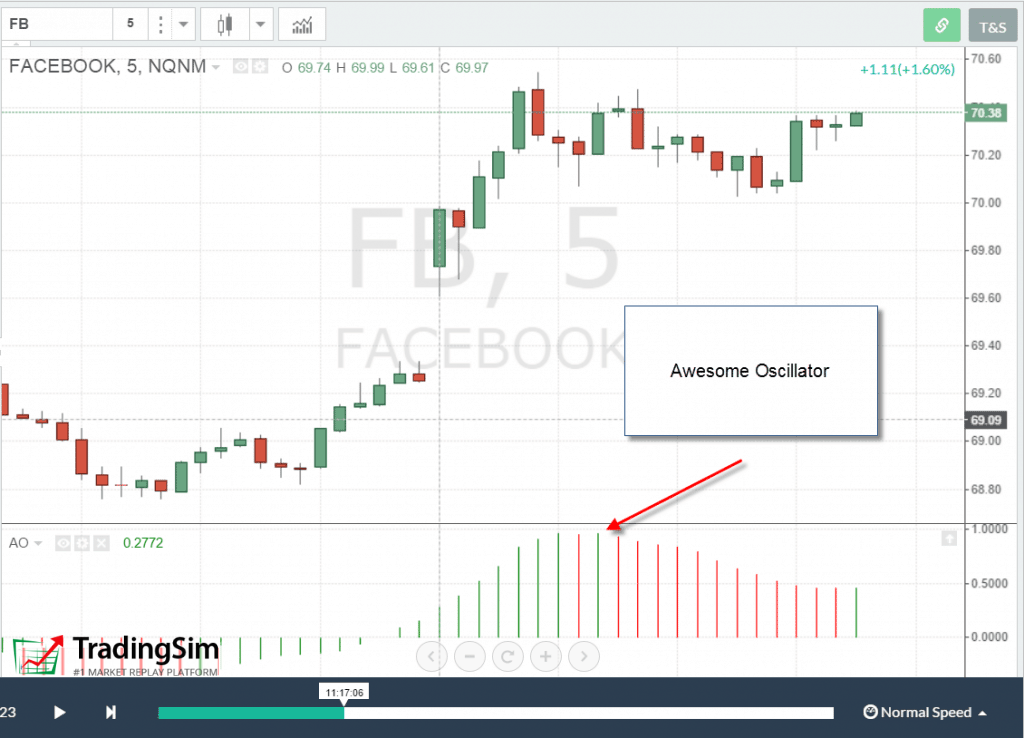
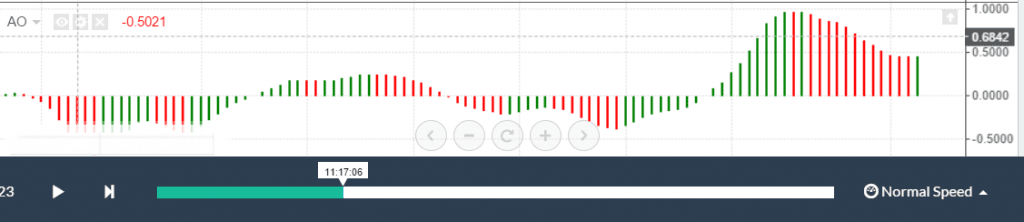
Awesome Oscillator on the Chart
Depending on your charting platform, the awesome oscillator indicator can appear in many different formats. Nevertheless, the most common format of the awesome oscillator is a histogram.
The awesome oscillator indicator will fluctuate between positive and negative territory. A positive reading means the fast period is greater than the slow and conversely, a negative is when the fast is less than the slow.
The one item to point out is that the color of the bars printed represent how the awesome oscillator printed for a period. Hence, you can have a green histogram, while the awesome oscillator is below the 0 line.
Awesome Oscillator Histogram
Basic Awesome Oscillator Trading Strategies
Now that we are all grounded on the awesome oscillator, let’s briefly cover the 4 most common awesome oscillator strategies for day trading.
#1 – Cross Above or Below the Zero Line
If you use this strategy by itself, you will lose money. To trust an indicator blindly without any other confirming analysis is the quickest way to burn through your cash.
Therefore, the strategy, if you want to call it that, calls for a long position when the awesome oscillator goes from negative to positive territory. Conversely, when the awesome oscillator indicator goes from positive to negative territory, a trader should enter a short position.
Without doing a ton of research, you can only imagine the number of false readings you would receive during a choppy market.
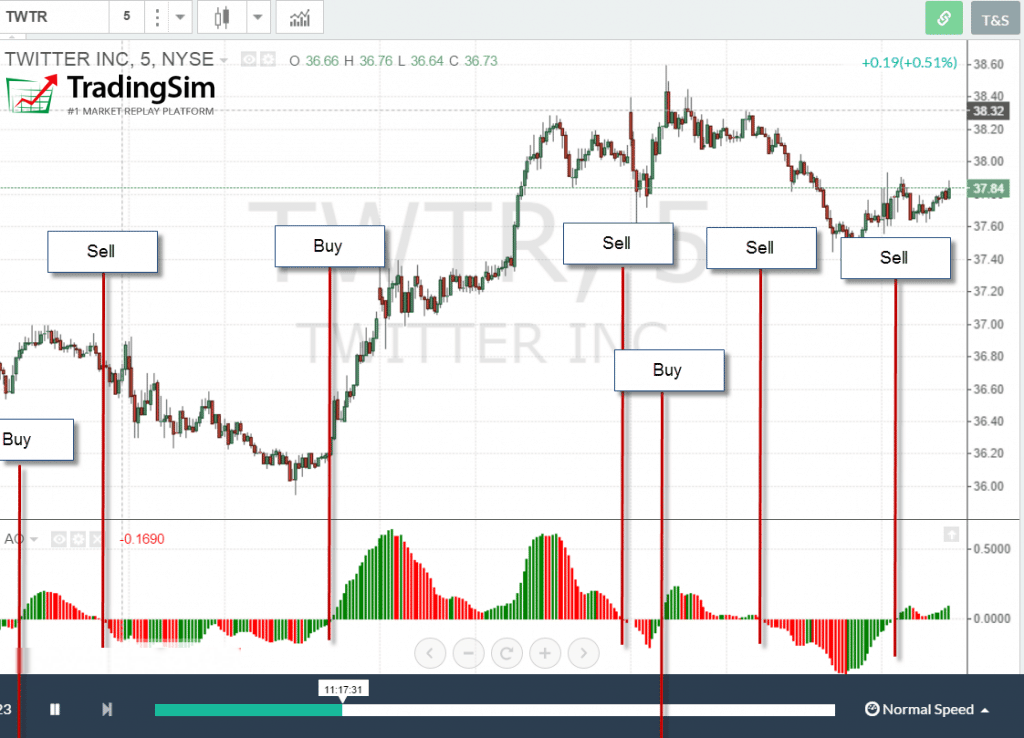
Let’s look at a chart example to see the cross of the 0 line in action.
Awesome Oscillator 0 Cross
In the above example, there were 7 signals where the awesome oscillator indicator crossed the 0 line. Out of the 7 signals, 2 were able to capture sizable moves.
This 5-minute chart of Twitter illustrates the main issue with this strategy, which is that the market will whipsaw you around like crazy. Choppy markets plus oscillators equal fewer profits and more commissions.
For this reason, we give the cross of the 0 line an F.
#2 – Saucer Strategy
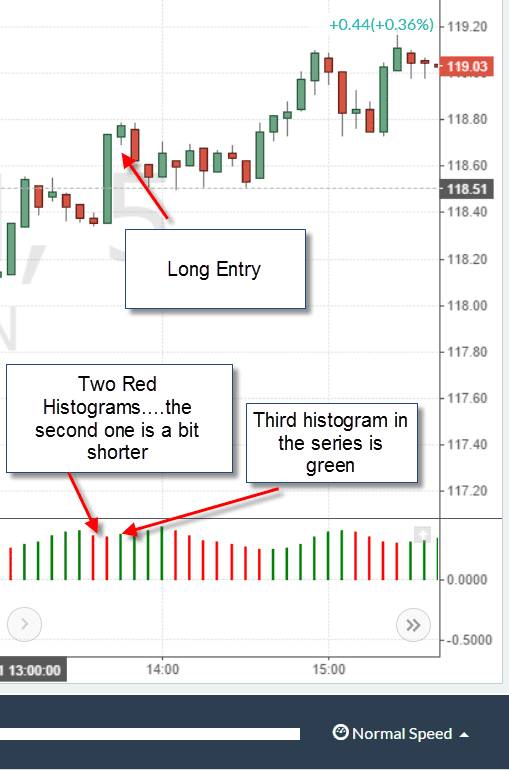
The saucer strategy received its name because it resembles that of a saucer. The setup consists of three histograms for both long and short entries.
Long Setup
Awesome Oscillator is above 0
There are two consecutive red histograms
The second red histogram is shorter than the first
The third histogram is green
A trader buys the fourth candlestick on the open
Short Setup
Awesome Oscillator is below 0
There are two consecutive green histograms
The second green histogram is shorter than the first
The third histogram is red
Trader shorts the fourth candlestick on the open
Without going into too much detail, this sounds like a basic 3 candlestick reversal pattern that continues in the direction of the primary trend.
Awesome Oscillator Saucer Strategy
Explanation:
In the above example, AMGN experienced a saucer setup and a long entry was executed. The stock drifted higher; however, we have noticed from glancing at a number of charts, the buy and sell saucer signals generally come after a little pop. If you trade the saucer strategy, you have to realize you are not buying the weakness, so you may get a high tick or two when day trading.
The saucer strategy is slightly better than the 0 cross, because it requires a specific formation across three histograms. Naturally, this is a tougher setup to locate on the chart.
However, you can find this pattern when day trading literally dozens of times throughout the day.
Although we are attempting to locate a continuation in the trend after a minor breather in the direction of the primary trend, the setup is just too simple. It doesn’t account for trend lines or the larger formation in play.
Due to the number of potential saucer signals and the lack of context to the bigger trend, we give the saucer strategy a D.
#3 – Twin Peaks
Now, this is not the restaurant for all you chicken wing and brew fans out there.
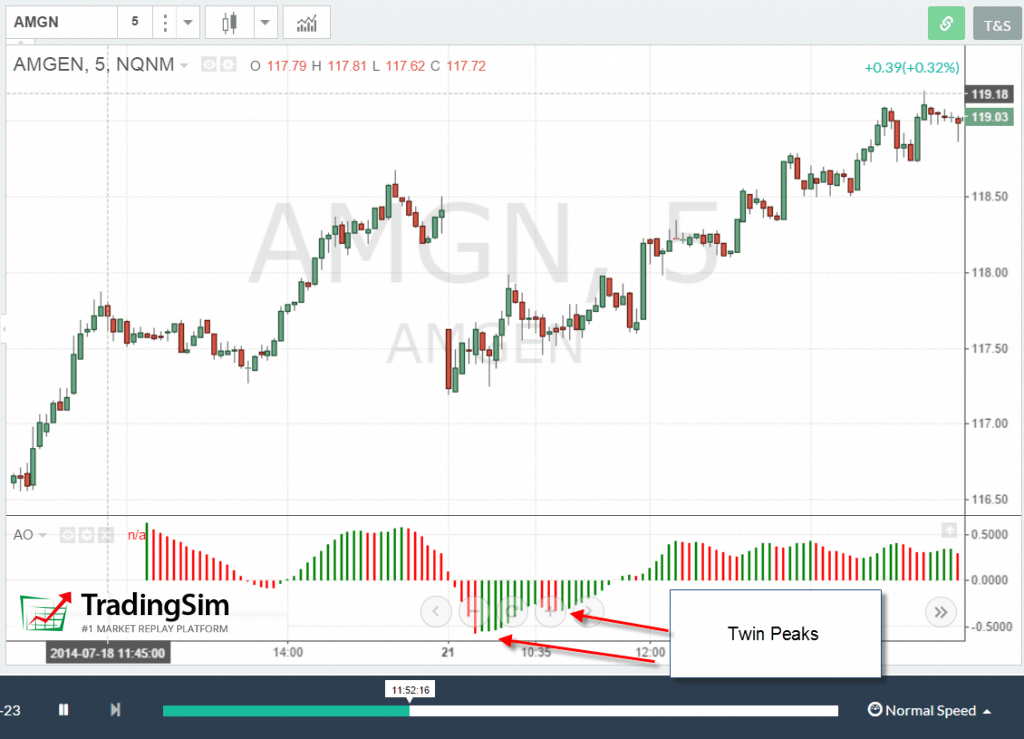
This is a basic strategy, which looks for a double bottom in the awesome oscillator indicator.
Bullish Twin Peaks
The awesome oscillator is below 0
There are two swing lows of the awesome oscillator and the second low is higher than the first
The histogram after the second low is green
Twin Peaks
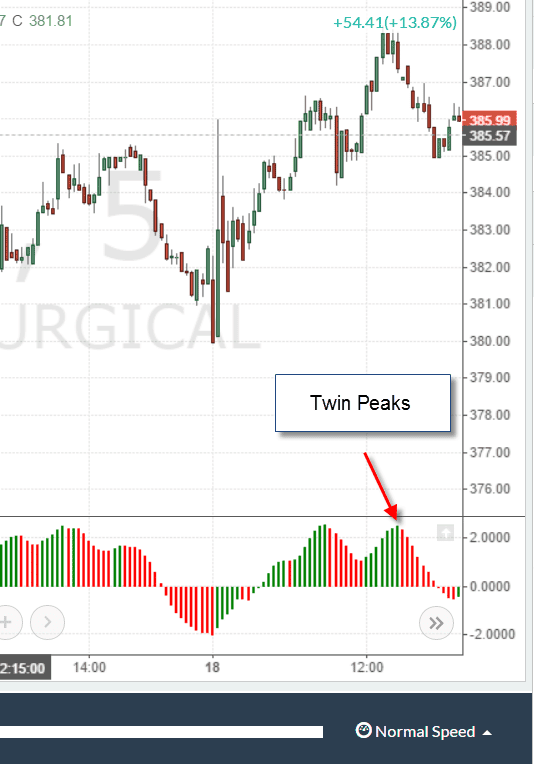
Bearish Twin Peaks
The awesome oscillator is above 0
There are two swing highs of the awesome oscillator and the second high is lower than the first
The histogram after the second peak is red
Bearish Twin Peaks Example
As you have probably already guessed, of the three most common awesome oscillator strategies, we vote this one the highest. The reason being, the twin peaks strategy accounts for the current setup of the stock. The twin peaks are also a contrarian strategy as you are entering short positions when the indicator is above 0 and buying when below 0.
Therefore, the verdict is in and we give the twin peaks strategy a solid C+.
#4 – Bonus Strategy
You will not find this strategy anywhere on the web, so don’t waste your time looking for it.
Going back to the crossing of the 0 line, what if we could refine that a little to allow us to filter out false signals, as well as buy or short prior to the actual cross of the 0 line.
This approach would keep us out of choppy markets and allow us to reap the gains that come before waiting on confirmation from a break of the 0 line.
We’re going to coin the setup as the Awesome Oscillator (AO) Trendline Cross
Long Setup – AO Trendline Cross
Awesome Oscillator has two swing highs above the 0 line
Draw a trendline connecting the two swing highs down through the 0 line
Buy a break of the trendline
AO Trendline Cross
As you can see in the above example, by opening a position on the break of the trendline prior to the cross above the 0 line, you are able to eat more of the gains.
The other point to note is that the downward sloping line requires two swing points of the AO oscillator and the second swing point needs to be low enough to create the downward trendline.
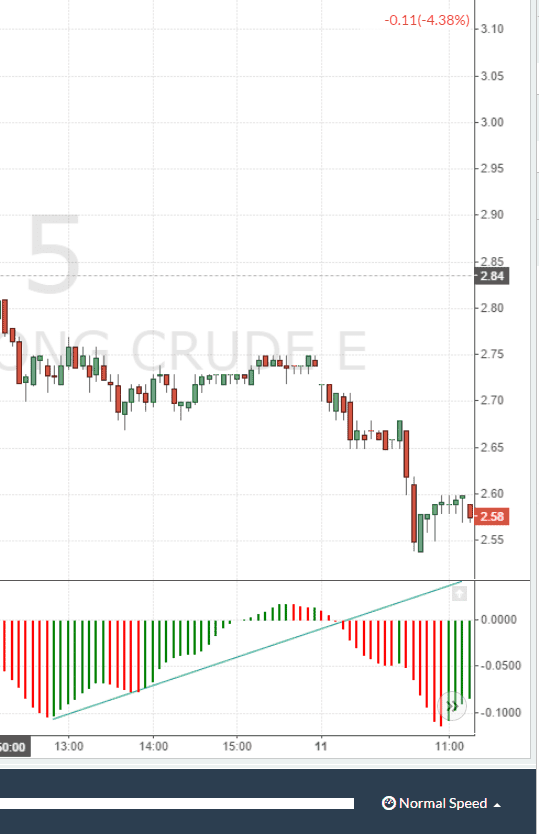
Bearish Setup – AO Trendline Cross
Awesome Oscillator has two swing lows below the 0 line
Draw a trendline connecting the two swing lows up through the 0 line
Sell Short a break of the trendline
Bearish AO Trendline Cross
In this example the cross down through the uptrend line happened at the same time there was a cross of the 0 line by the AO indicator. After the break, the stock quickly went lower heading into the 11 am time frame.
Where Can the Awesome Oscillator Go Wrong?
When testing strategies, we like to go through indicators and find where things fail. Finding the blind spots of an indicator can be just as helpful as displaying these beautiful setups that always work out.
So, to this point, let’s walk through a few examples where the trusted awesome oscillator indicator will have you on the wrong side of the trade.
#1 High Awesome Oscillator Values Beget Higher Price Values
If you are a contrarian trader, a high value in the AO may lead you to want to take a trade in the opposite direction of the primary trend.
It’s natural to see the extremely high reading and then say to yourself, there is no way the stock can go any higher.
This is where things can get really messy for you as a trader. Even if the AO keeps you on the right side of the trade with a high winning percentage, you only need one trade to get away from you and blow up all of your progress for the month.
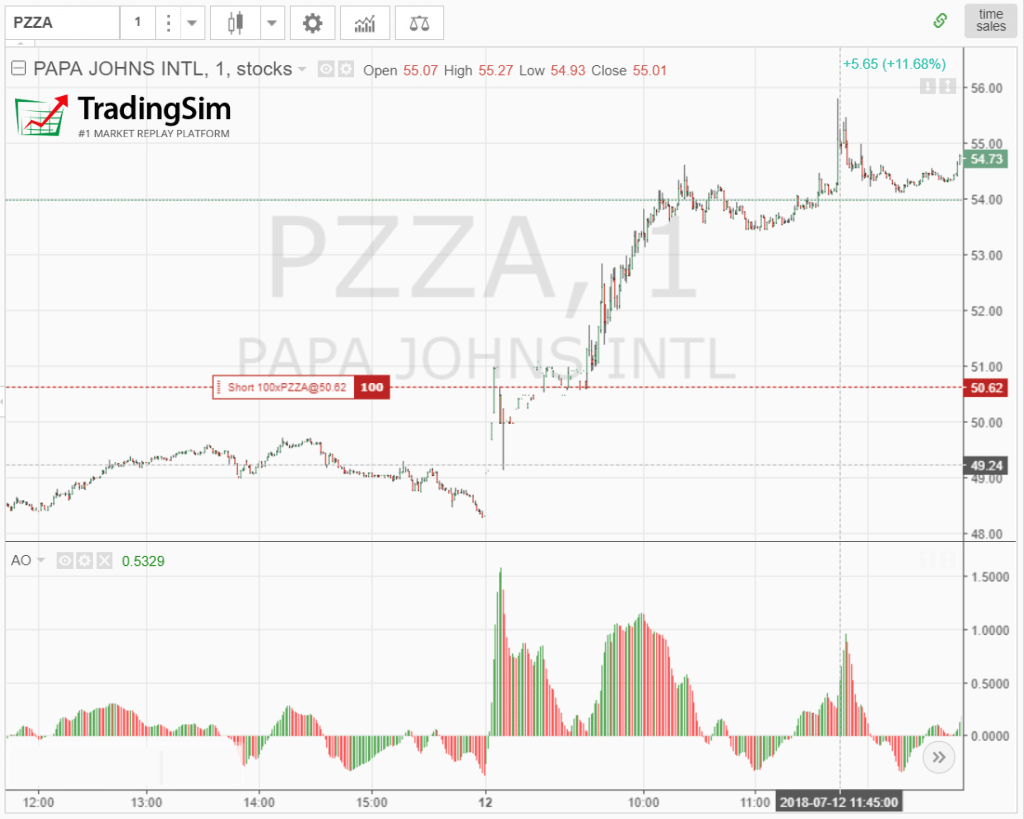
Papa John’s Failed Short
Can you identify the three peaks in the AO indicator? As you can see in the chart, we entered the trade on the open at $50.62.
Any short trader would have had enough reason with the negative news on Papa John’s founder at the time to short the morning pop. In addition, the AO was spiking like crazy and the rally did appear sustainable.
Well, guess what happened – Papa John’s peaked at $55.83 before consolidating. This would have represented a move against us of 10.2%. Now if you are day trading and using a lot of leverage, it goes without saying how much this one trade could hurt your bottom line.
How to prevent yourself from getting caught in this situation? First, a major expansion of the awesome oscillator indicator in one direction can signal a really strong trend. So, do yourself a favor and do not stand in front of the bull.
Secondly, use stops when you are trading. There is no reason you should ever let the market go against you this much.
#2 AO Readings on Low Float Stocks Can Get Tricky
Many of you may trade larger caps rather than low float stocks, because you’re able to scale in with larger size with low volatility plays. However, we know low float movers are a big deal in the day trading community.
So, how does the AO indicator handle low float movers?
Well like most indicators – not well.
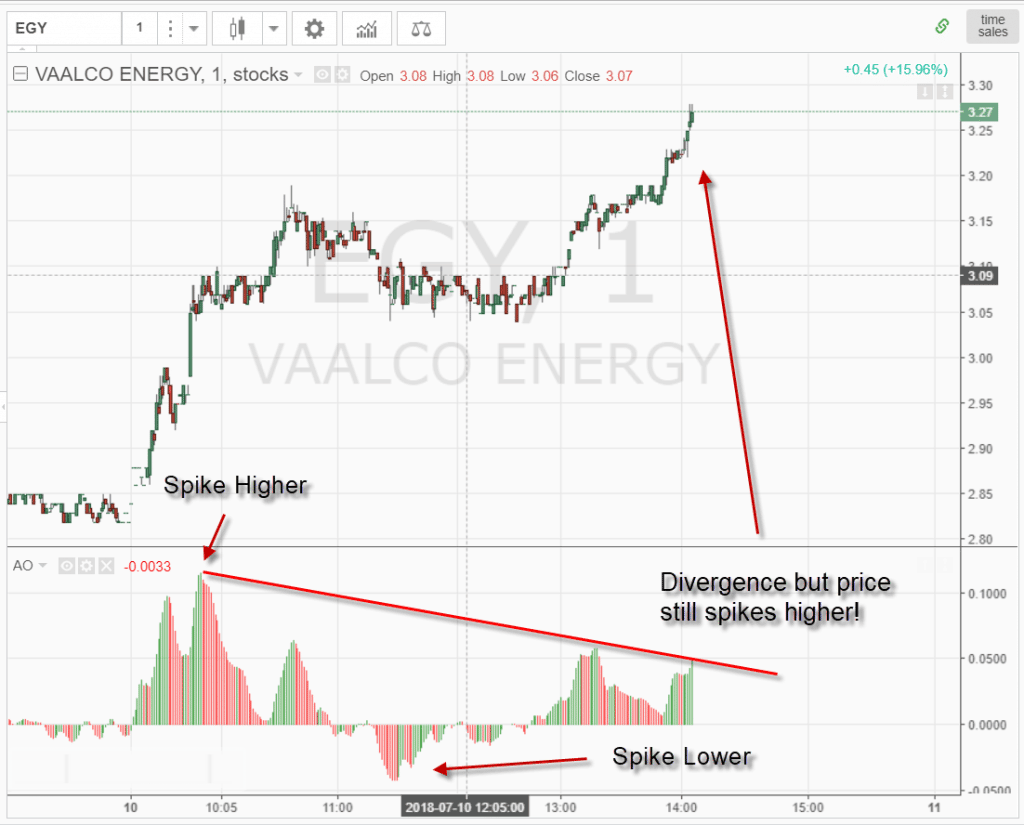
Low Float – False Signals
This is one of those charts that would have you pulling your hair out. It’s like everything that could go wrong with the indicator did, in fact, go wrong!
First, if you shorted the opening spike, similar to our Papa John’s example, this would have caused you serious pain. Next, EGY spikes lower giving the impression the stock was going to fill the gap. Wrong again, as EGY only consolidates leaving you with a short position that goes nowhere.
Lastly, EGY breaks the morning high all the while displaying a divergence with the awesome oscillator and the price action.
In every instance, the indicator is giving off false signals and leaving you on the wrong side of the trade.
Well, it’s not all the fault of the AO indicator.
You as a trader need to be prepared for the harsh reality of trading low float stocks. These securities will move erratically, with volume and in a very short period of time.
In a related article on Stocktwits Blog [4], see how day trader Dave Kelly describes trading low float stocks and the level of volatility with these securities.
We’re not saying ditch the AO indicator altogether but be prepared to combine the AO with other indicators. Also, lower your expectations about how accurately the oscillator can create price boundaries which a low float will respect.
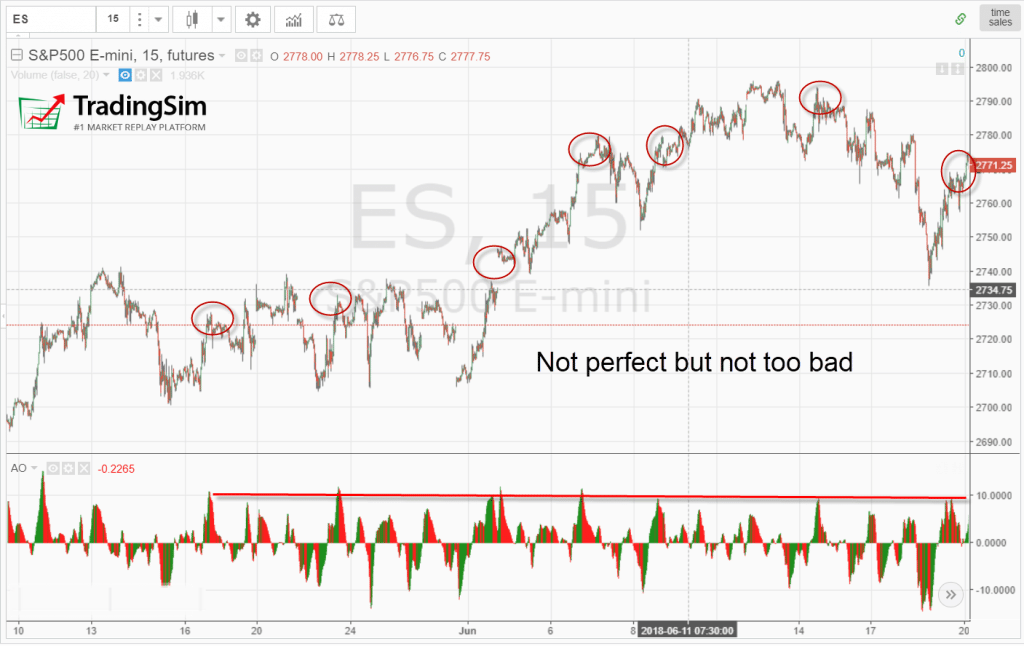
The reason the awesome oscillator indicator works so well with the e-Mini is that the security responds to technical patterns and indicators more consistently due to its lower volatility.
Sell Signals
Notice how these AO high readings led to minor pullbacks in price. Now, these are not going to make you rich, but you can capitalize on these short-term trends.
There were still a few signals that did not work out, so you will need to keep stops as a part of your trading strategy to make sure your winners are bigger than your losers.
In Summary
So out of the trading strategies detailed in this article, which one works best for your trading style?
You may find that you like the idea of drilling into where the awesome oscillator indicator fails to uncover trading opportunities.
No matter what strategy you lock in on, you will want to make sure you use stops in order to protect your profits. Also, be sure to look at different types of securities to see which one fits you the best.
To recap these types of securities, please see the below list:
5 Trading Strategies Using the Relative Vigor Index
In this article, we will cover the relative vigor index. The index is not one of the more popular indicators, but that does not mean it lacks accuracy. We will cover five strategies you can test to...
Price Oscillator Definition The price oscillator indicator displays the difference of two moving averages in either points or in percentages. This technical indicator is very similar to the MACD, but...
Whether you want to believe it or not, Fibonacci levels play a critical role in defining support and resistance levels when day trading. Not covered much in the trading community is the impact or...


 Day Trading Indicators


